A certificate rewards members who finish your course. You turn it on for each course and choose its wording and the details it shows. When a member completes every lesson, a certificate with its own serial number is created, emailed to them and added to their library, and anyone they share it with can check that it's genuine.
Who can do this
- Owners, admins and staff can set up a course's certificate.
- Viewers can open the tab and see the preview. Save template answers "You don’t have permission for this.", Upload logo and Upload background answer "Not allowed", and nothing changes.
- When your free trial has ended, the workspace is read-only: saving shows "Your free trial has ended, so your workspace is read-only…" until you subscribe in Settings → Billing.
Set up the certificate
- Open the course and click the Certificate tab (
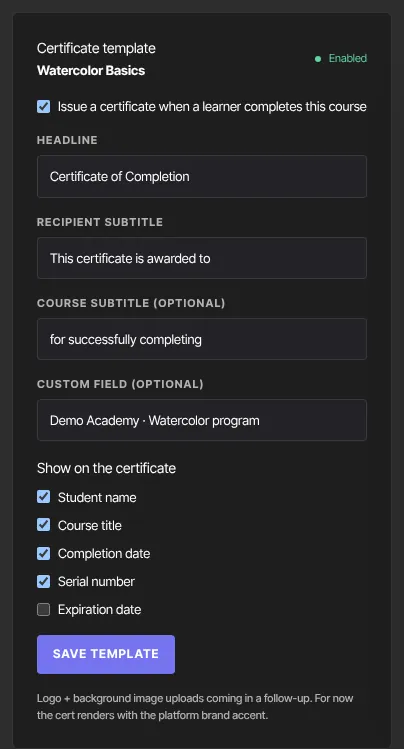
/products/{id}/certificate). The page is titled Certificate template. - Tick Issue a certificate when a learner completes this course. The badge at the top changes from Disabled to Enabled.
- Edit the wording: Headline (for example "Certificate of Completion"), Recipient subtitle, Course subtitle (optional) and Custom field (optional), such as an accreditation line.
- Under Show on the certificate, tick what to include: Student name, Course title, Completion date and Serial number.
- Click Save template. Saved appears.
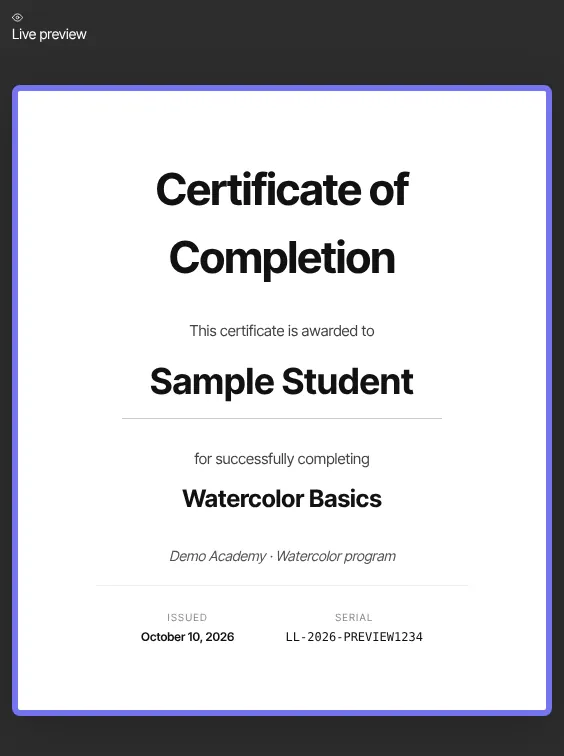
- Check the Live preview on the right. It shows the certificate with a sample student's name, exactly as members will see it.
To make certificates expire, tick Expiration date and enter Valid for (days) (365 is one year); the preview shows the expiry date. Each certificate issued from then on expires that many days after it's issued and shows the date; certificates already issued keep theirs.
Add your logo and a background
- Under Branding, click Upload logo and pick a JPG, PNG, WebP or GIF up to 10 MB. A PNG with a transparent background works best. It appears above the headline.
- Click Upload background to put an image behind the text. Use a light, landscape image (about 1400 × 1000) so the wording stays readable.
- Each image is saved as soon as it uploads; you don't need to click Save template. The live preview shows it straight away.
- To change one, click Replace logo or Replace background; to take it off, click Remove.
The logo and background show on every certificate for the course, including ones already issued, and on their public pages. Uploaded images also appear in your Media Library, where an image a certificate uses can't be deleted until you remove it here.
When a member finishes
- A member completes the course when they've completed every Live lesson, with Mark complete or by passing a lesson's quiz.
- If the certificate is turned on at that moment, one certificate is created for them, with a serial number.
- They get an email with their certificate (by default titled "Your certificate", followed by the course name), and the certificate appears under Certificates in their member library.
Each certificate has a public page at /c/ followed by its serial number, which anyone can open to check it. When a certificate has an expiry date, the page also says Valid until … or This certificate expired on …. On the course's Customers tab, the Certificate column shows Issued, linking to that page.
Turning the certificate on later doesn't create certificates for members who had already finished. To give them one, build an automation with the trigger Tag is added (a tag such as "back-issue-certificate") and the action Send a certificate for this course, and publish it. Then add that tag to each member who finished, on their contact record or several at once from Contacts (see Change many contacts at once). To see who finished, set the status filter on the Customers tab to Completed. The action doesn't check progress, so tag only members who finished. Their certificate appears in their library and on the Customers tab, but no certificate email is sent, so let them know. A member who already has a certificate for the course keeps it; they don't get a second one.
What happens next
- Members find their certificates in their library; the member guide is Your certificates.
- To do more when someone finishes, such as sending a congratulations email or adding a tag, start an automation with the Course completed or Certificate is issued trigger.
Common errors
- "Too small: expected string to have >=1 characters": the Headline or Recipient subtitle is empty. Fill both in.
- "Could not save the certificate template.": save again in a moment.
- "You don’t have permission for this.": you're a viewer. Ask an owner, admin or staff member to change the certificate.
- "Your free trial has ended, so your workspace is read-only…": subscribe in Settings → Billing to make changes again.
- "Not allowed" when uploading a logo or background: viewers can't change the certificate.
- "Use a JPG, PNG, WebP, or GIF image." or "Image must be 10 MB or smaller.": pick a different image for the logo or background.
- "That image isn’t available — upload it again.": the upload didn't finish. Upload the image again.
- A member finished but has no certificate: the certificate wasn't turned on and saved when they finished. It can't be issued to them afterwards, so turn it on before members reach the end.