Your course's structure lives on the Outline tab of the course builder. A course is made of modules (sections) that hold lessons, and a module can hold one level of submodules to group lessons inside a long section. You add, rename, reorder and remove them all from this one screen.
Who can do this
- Owners and admins can do everything on the outline.
- Staff can add modules, submodules and lessons, edit modules, drag to reorder and write lessons. Setting a row Live or Draft from the outline, and deleting rows, need an owner or admin: staff see "You don’t have permission to do that." Staff can still change a lesson's Status in the lesson editor.
- Viewers can open the builder, but every change is refused with "You don’t have permission to do that." or "You don’t have permission for this."
Open the course builder
- Go to Catalog and click the course's title. The builder opens on the Outline tab (
/products/{id}/builder). - The header shows how many modules and lessons the course has. The first module is expanded; click another module's title or arrow to expand it.
Add modules, submodules and lessons
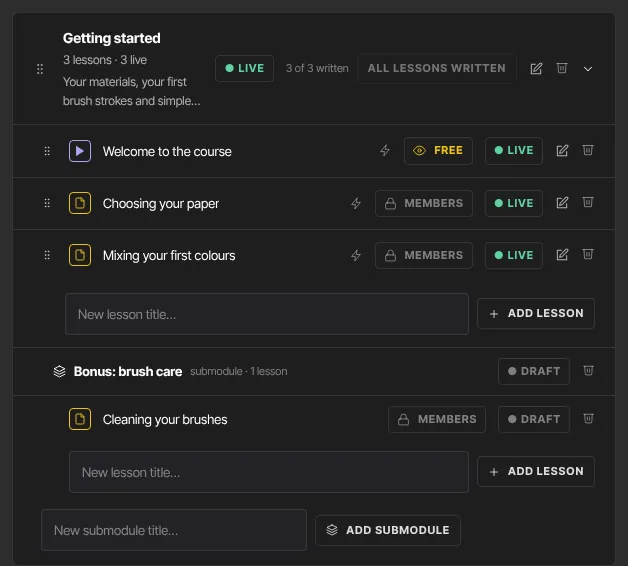
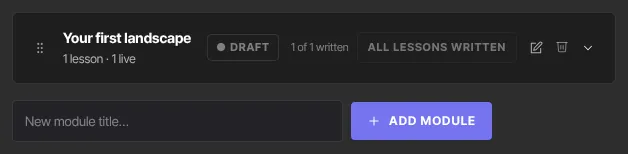
- Module: at the bottom of the outline, type in New module title… and click Add module.
- Lesson: expand a module, type in New lesson title… under its lessons and click Add lesson.
- Submodule: expand a module, type in New submodule title… and click Add submodule. It appears indented inside the module, with its own Add lesson row.
Everything you add starts as ● Draft, hidden from members. If you leave the title blank, it's called "New module" or "New lesson".
Edit a module's title, description and image
- Click the pencil (Rename module) on a top-level module row.
- Change the Module title, and describe what the module covers in the box below it. Members see the description, and AI lesson drafting uses it as a brief.
- To add a picture, click Add image; to change it, Replace image or Remove. Images save as soon as they upload.
- Click Save, or Cancel to discard your changes.
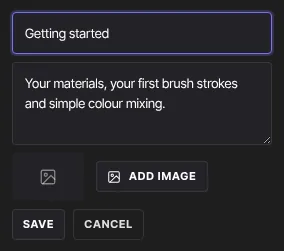
Submodules can't be renamed or given an image.
Reorder modules and lessons
- Grab the drag handle at the left of a module or lesson row.
- Drop it on another row in the same list. The new order saves straight away.
You can reorder top-level modules, and lessons within one top-level module. Submodules and their lessons can't be dragged. To move a lesson to a different module, use the Module menu in the lesson editor; see Write and set up a lesson.
Set a module or lesson Live or Draft
- Click the ● Draft or ● Live pill on a row (owners and admins). It switches between the two.
- A Live lesson is visible to members once the course is published; a Draft lesson is hidden.
Members see a module as soon as it has at least one Live lesson, whatever the module's own pill says. To hide a whole module, set its lessons to Draft. Each module row shows how many of its lessons are live, for example "3 lessons · 3 live".
Delete a module, submodule or lesson
- Click the trash icon on the row (Delete module, Delete submodule or Delete lesson).
- It's deleted straight away. There's no confirmation and no undo.
Deleting a module also deletes its submodules and every lesson in them, along with those lessons' quizzes, files, comments and your members' completion records. If you only want to hide something, set it to Draft instead.
What happens next
- Members see your changes the next time they open the course. Only Live lessons in a published course are shown.
- Click Preview as student in the builder header to see the course as members do. It opens in a new tab; click Back to editor in the bar at the top, or close the tab, to return.
- Next, fill in each lesson: Write and set up a lesson.
Common errors
- "You don’t have permission to do that.": staff can't set rows Live or Draft, or delete them, from the outline. Viewers can't change the outline at all.
- "Could not save the new order.": the drag didn't save, and the list went back to its last saved order. Try again.
- "Please choose an image file.": module images must be pictures.
- "Could not start the upload.", "Upload failed." or "Could not finalize the upload.": the module image didn't upload. Try again.
- "Could not update the module image.": try again in a moment.
- "Your free trial has ended, so your workspace is read-only. …": subscribe in Settings → Billing to edit again.
- A module title doesn't change after you save: titles can't be blank. Enter a title and click Save again.