Your Zinstruct account is the login you use to build and run your school. Creating it takes three short stages: sign up with your email and a password, confirm your email address, then set up your workspace. Your free 7-day trial starts the moment workspace setup finishes, and you can pick a paid plan then or any time later.
Who can do this
Anyone with an email address, including one you already use to take courses on Zinstruct. You become the owner of the new workspace. No plan is needed to start; every new workspace begins on the trial.
If you already buy or take courses from a school on Zinstruct, that email already has a login, and you can use it here. See "Already a student on Zinstruct?" below.
Sign up
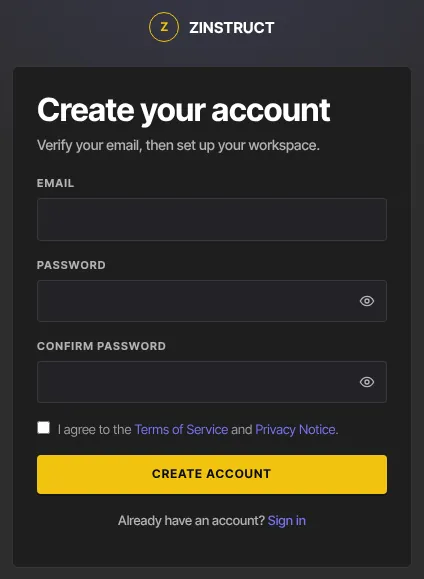
- Open the signup page at
/signupon app.zinstruct.com. It's titled Create your account. - Fill in Email, Password (at least 8 characters) and Confirm password.
- Tick I agree to the Terms of Service and Privacy Notice.
- Click Create account.
- The form changes to Check your email. We've sent an email titled "Confirm your email address". If it isn't in your inbox, check spam or junk, or click Resend email. Picked the wrong address? Click Use a different email.
Confirm your email address
- In the email, click Confirm email address. It opens a page titled You're almost in.
- Click Create my account on that page. Nothing is created until you press it, so a mail scanner that opens the link can't use it up.
- You're signed in and taken to workspace setup.
No account exists until you confirm. If you didn't sign up, ignore the email.
Set up your workspace
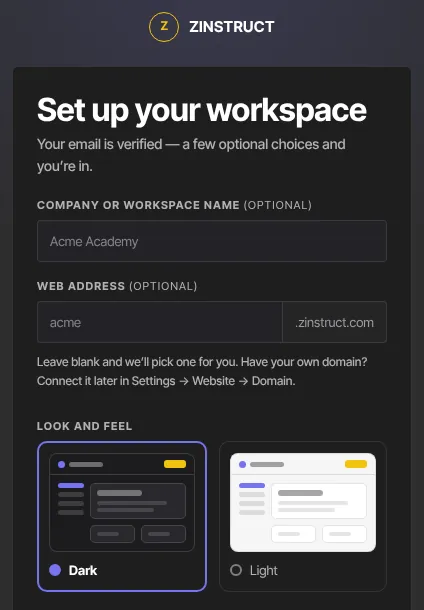
The page is titled Set up your workspace. Every field is optional, and you can change all of them later in Settings.
- Company or workspace name: shown across your admin app.
- Web address: your free
yourname.zinstruct.comaddress, where your school's site and member area live. - I already have a website: tick it if your main website lives somewhere else and you want Zinstruct for members, courses and checkout only. Optionally enter Your website, starting with https://. Your address then opens your Join page (with Already a member? Sign in for members), so you don't need to build pages here, and setup takes you to Website → Domain to connect a subdomain such as learn.yourwebsite.com. See Connect your own website to Zinstruct.
- Look and feel: choose Dark or Light for your admin app. The setup screen switches as soon as you pick, so you see the look before you continue.
- Under Choose a plan (optional), leave Decide later selected to explore first, or pick a plan (see the next section).
- Tick I agree to the Terms of Service and Privacy Notice. This one is required.
- Click Continue. You land on your Dashboard, which greets you with Welcome to your workspace name. If you ticked I already have a website, you land on Website → Domain instead, with a short welcome that lists the next steps.
Pick a plan during setup (optional)
- Under Choose a plan (optional), click a plan card. When yearly prices exist, switch between Monthly and Yearly.
- The button now reads Continue to checkout. Click it.
- Your workspace is created first, then you go to a secure Stripe checkout page for the plan. You aren't charged until your trial ends.
- After paying you return to Settings → Billing. If you cancel the checkout, you return to Billing and can subscribe later.
Already a student on Zinstruct?
If you sign in to courses from any school on Zinstruct, your email already has a login, and you can turn it into a creator account:
- Go to
/signup, enter that email, fill in the two password boxes, tick the agreement box and click Create account. You'll see Check your email. - We send an email titled "Create your workspace". Your existing login doesn't change, and the password you just typed isn't saved.
- Click Set up your workspace in the email, then the Confirm email address button on the page that opens.
- You're signed in and taken to Set up your workspace. Continue as above. Your courses stay in your library.
- To sign in to the admin app with a password next time, set one with Reset a forgotten password if you've never had one.
If that email already runs a workspace, no email is sent: sign in or reset your password instead.
What happens next
- Your workspace starts a 7-day trial. A banner in the admin app counts down the days left.
- Your Dashboard shows your key numbers and quick-create shortcuts. A good first move is creating a product.
- Your school's site and its web address are set up the first time you open Website or Settings.
- To bring in teammates, see Invite your team.
Common errors
- "Use at least 8 characters": the password is too short.
- "We couldn’t confirm you’re not a bot. Please reload the page and try again." or the button stays greyed out: a quick, usually invisible check that you're a person didn't finish. Reload the page. If it keeps happening, a browser extension or network filter may be blocking challenges.cloudflare.com: allow it, or try another browser or network.
- "Passwords don’t match": retype Confirm password so it matches.
- "Please accept the Terms of Service and Privacy Policy to continue.": tick the agreement box, then click Create account (or, on workspace setup, Continue) again.
- "Too many attempts. Please wait a few minutes and try again.": you've tried several signups, or set up several workspaces, in a short time. Wait a few minutes.
- "We can’t send email right now. Please try again in a few minutes." or "We couldn’t start your signup. Please try again in a few minutes.": a temporary problem on our side. Try again shortly.
- "We couldn’t send the confirmation email, so the account was not created…": the email couldn't be delivered to that address. Check the spelling, or use another address.
- "That link has expired or was already used. Start again to get a new one.": confirmation links work once. Click Start again and get a new link, then sign up again with the same email.
- "The web address “…” is already taken — try another.": choose a different web address.
- "Sign-up is not available for this account. Contact support if you believe this is an error.": our safety checks stopped this signup or workspace setup. Contact support from the same email.
- "Workspace setup failed: …": setup didn't finish. Reload the page and click Continue again.
- Plan checkout didn't open: your workspace is still created. You land on Settings → Billing; subscribe from there.