A community is a members-only space on your school's site where people post, comment, meet up and take part in challenges. Each community you sell is a product in your Catalog. You create it, set it up while it's still a draft, look at it the way a member will, then publish it and sell it through an offer.
Who can do this
- Owners, admins and staff can create a community product and change everything on its tabs.
- Only owners and admins can publish or unpublish it. When staff click Publish access group or Unpublish, nothing changes and a message says "You don’t have permission to do that."
- Viewers can open these pages, but every change is refused. Forms say "You don’t have permission for this." When a viewer clicks Preview, they see Members only instead of the community.
- Each new product counts toward your plan's product limit. See Plans and billing.
These are workspace roles: they decide what your team can do in the admin app. Inside a community you can also give members community roles, such as Leader or Moderator. Those only apply inside the community and have nothing to do with your team. See Community members, roles and bans.
Create a community product
- In the sidebar, open Catalog, then Community (
/products?tab=community). - Click New community. From Catalog you can also click New product, choose Community under What do you want to create?, then click Get started.
- On Community details, fill in Title: the name you sell it under, such as "Watercolor Circle". Add a Brief description if you like.
- Click Create community.
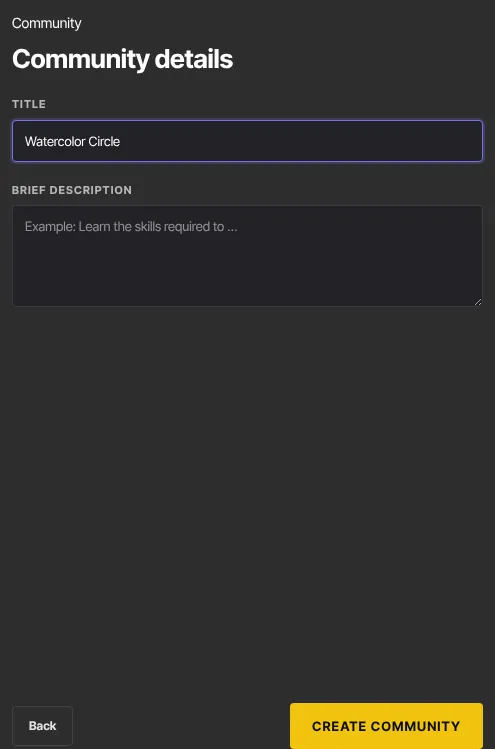
- You land on the product's builder, on its Access group tab (
/products/<id>/builder). The community is a draft, so members can't see it yet.
The product comes ready to use: its access group and one space, General, are created with it. The same happens for a community product created through the API or a catalog import.
Name your community
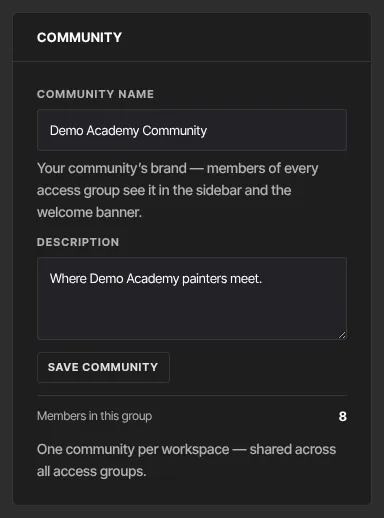
Your workspace has one community, shared by every community product you sell. The Community panel on the right of the Access group tab names it.
- Fill in Community name and, if you like, a Description. Members of every community product see this name in their sidebar and in the welcome banner.
- Click Save community. "● Saved" appears.
- The panel also shows Members in this group: the number of people enrolled in this product.
The Access group panel on the left names this product's group of members. See Access groups: the groups inside your community.
Set it up
The product has seven tabs: Access group, Brand, Posts, Spaces, Meetups, Challenges and Offers. Offers lists the offers that sell this community; open one with Upsells & add-ons to add a one-click upsell, a downsell for buyers who say no, or an order bump. An upsell or downsell can be a subscription too (say, a VIP tier or a cheaper monthly): when a buyer accepts it, it opens that offer's checkout. The other tabs start with "Settings for" your product's name "only", and a See Whole Community Settings Here link to Community Settings, where you manage what all your community products share.
The General space is already there, so members have somewhere to post from the start. Next, see Spaces: your community channels and Brand your community.
Preview it as a member
- Click Preview in the product header. The member view opens (
/community/<id>), even while the product is a draft. - Read, post, react and send messages to check everything works.

Anything you post while previewing appears under your own name, like a member's post. It doesn't carry a Host badge, and in a space that holds posts for review it waits for approval like everyone else's.
Publish or unpublish
- Click Publish access group in the product header. You can do this from any tab.
- The button changes to Unpublish. Members who have access can now open the community.
- To take it offline, click Unpublish. Members keep their access. Until you publish again they see "This community isn’t available right now", and a live room that's running ends.
Sell it
Add the product to an offer. Everyone who buys or claims that offer joins the community. When exactly one published offer sells the product, a Copy checkout link button appears in the header. To add someone by hand, see Grant and revoke access.
What happens next
- People with access find the community on their Community page on your school's site (such as yourname.zinstruct.com), with an Enter community card.
- The first time each person gets access, the owner gets a New community member email. Admins can turn it on for themselves on Notifications & privacy.
- "Joined a community" automations run for that person. They run the first time someone gets access, not when access they'd lost is restored.
- "Community post published" automations run when a member's post goes live, or when you approve it in a review space. For a post a member schedules for later, they run at the scheduled time, when the post appears.
Common errors
- "You don’t have permission for this.": your role is viewer. Ask an owner or admin.
- "You've reached your … plan's limit of … products. Upgrade in Settings → Billing to add more.": you're at your plan's product limit. Upgrade, or remove a product you don't use.
- "You don’t have permission to do that." after Publish access group or Unpublish: only owners and admins can publish.
- Members see "Members only" and "You need active access to this community to view it.": they don't have access (no offer or grant, access revoked, or banned). Check their access on Grant and revoke access.
- Members see "This community is being set up. Check back soon.": the community has no spaces yet, usually because it's an older community product. Open its Spaces tab, which adds General.
- "Set up this community product first (open the builder and save its access group).": open the Access group tab first.
- "Could not save the community.": try again in a moment.