A product is what your audience gets access to: a course, a consulting program, a community, a podcast, a newsletter or a file. You sell a product through an offer, which holds the price, so one product can be sold at several prices or bundled with others. Every product starts as a draft and stays hidden from members until you publish it.
Who can do this
- Owners, admins and staff can create products and change their title, description and thumbnail.
- Viewers can open every product screen but can't change anything. A create or save shows "You don’t have permission for this."
- Publishing and unpublishing need an owner or admin. See Publish or unpublish a course.
- Every product counts toward your plan's product limit. See Plans and billing.
The six product types
- Course: modules and lessons with text, video, files and quizzes, plus drip, certificates and comments. See Create a course.
- Consulting: 1:1 or group sessions sold as a program. See Create a coaching program.
- Community: a members' space with channels and posts. See Build a community.
- Podcast: audio episodes your members stream from their library.
- Newsletter: issues you publish to a member archive and email to subscribers.
- File: downloads such as PDFs, templates or audio packs.
Find your products in the Catalog
- Click Catalog in the sidebar (
/products). The All tab lists every product with its Members, Created date, Type and Status (Live or Draft). - Use the tabs (All, Courses, Consulting, Community, Podcasts, Newsletters, Files) to filter by type, Drafts to see only unpublished products, or Archived to see the products you've archived (they're hidden from every other tab). Type in Search products… to find one by its title.
- Click a product's title to open its builder.
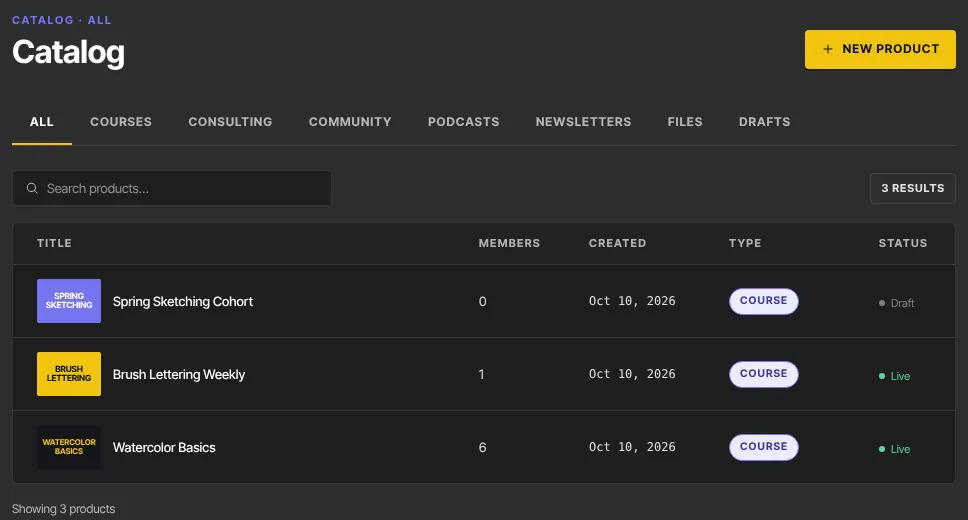
When your plan limits how many products you can have, a chip next to New product shows how many you've used out of that limit.
Create a product that isn't a course
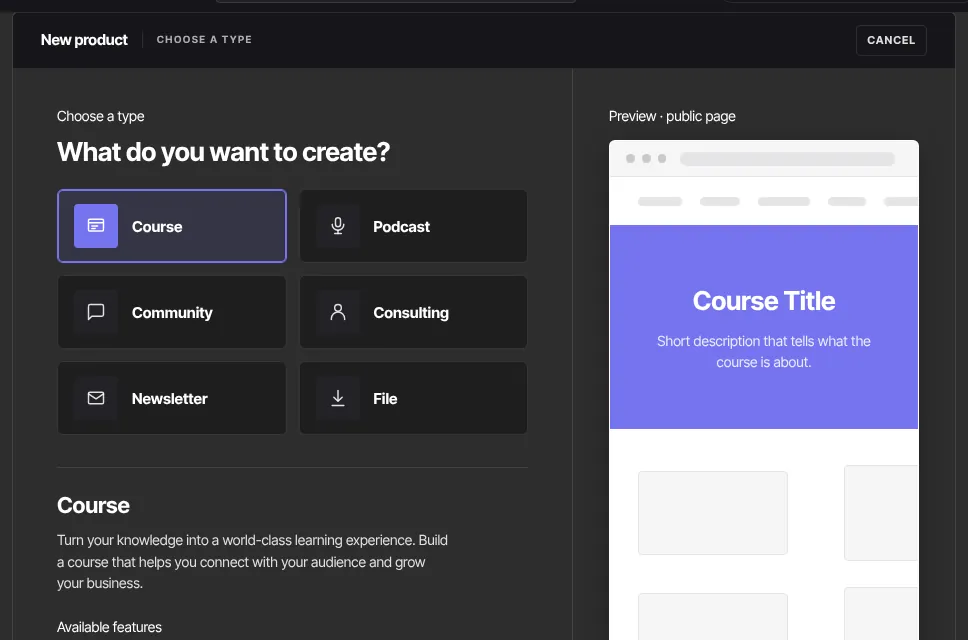
- In Catalog, click New product. The page asks What do you want to create?
- Pick Podcast, Community, Consulting, Newsletter or File. The panel underneath lists what that type includes.
- Click Get started.
- On the details step, fill in Title and Brief description. Some types ask for more: Consulting asks about the coach, the program type and how many sessions; File asks you to add the file; Consulting, Newsletter and File offer an optional Thumbnail image.
- Click the create button: Create Program, Create podcast, Create community, Create newsletter or Create file. The new product opens in its builder as a draft.
Courses have their own setup step; see Create a course. From a type's own list, such as Courses, the button reads New course and skips the type choice.
Change a product's title and description
Where you edit these depends on the type:
- Course or Newsletter: the Details panel on the product's Settings tab (
/products/{id}/settings). - Consulting: the Details tab.
- File: the Files tab, under the file list.
- Open the product and go to the tab above.
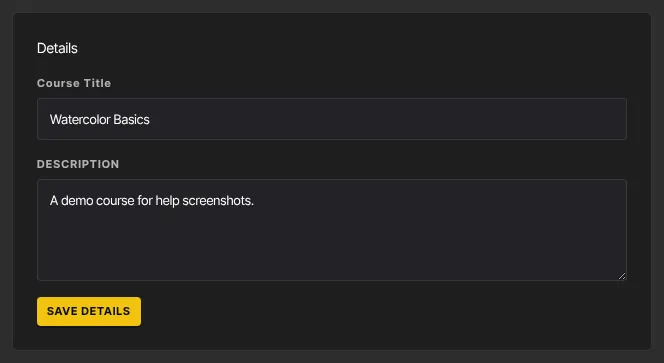
- Edit the title field (it's named after the type, for example Course Title) and Description.
- Click Save details. ● Saved appears.
Podcast and community products have no title or description form once they're created, so check the spelling before you create one.
Change a product's thumbnail
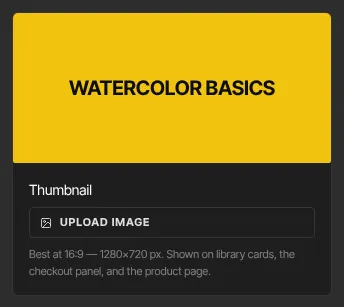
The thumbnail shows on library cards, the checkout panel and the product page. It looks best at 16:9, 1280×720 pixels.
- Open the course or file builder and find Thumbnail in the right-hand column. For a consulting program, use the Artwork panel on the Details tab.
- Click Upload image (or Replace image if one is set) and choose a JPG, PNG, WebP or GIF of 10 MB or less.
- The Crop thumbnail window opens. Drag and zoom to frame the picture, then click Save 16:9 crop, or Use full image to keep it as it is. GIFs skip this step so their animation is kept.
- The new image appears in the column and on the product's Catalog row.
Newsletter, podcast and community builders don't have a thumbnail control. A newsletter's thumbnail can only be set when you create it.
Archive or delete a product
A course, file, consulting program or newsletter has an Archive or delete panel at the bottom of its Settings tab (/products/{id}/settings). Only owners and admins see it.
Archive stops selling a product without taking it away from anyone who has it:
- Open the product's Settings tab and click Archive (for example Archive course).
- The product disappears from your Catalog (find it under the Archived tab), from your site, and from Discover and Plans in the member area. Its checkout links show "This offer isn't available any more", including bundles and add-ons that include it.
- Members who already have it keep their access, exactly as before.
To bring it back, open it from the Archived tab. Its builder shows Archived on … at the top: click Restore there, or use Restore on its Settings tab. It returns to your Catalog and can be sold again.
Delete removes a product for good, with its modules, lessons, files and offers. It's only offered when nobody has the product and it has never been sold:
- On the Settings tab, type the product's exact name under Delete.
- Click Delete … permanently. You're taken back to the Catalog, which says "Product deleted." There's no undo.
If the product has students or sales, the panel explains why it can't be deleted ("This product has 3 students and 1 sale, so it can’t be deleted…") and you archive it instead. That way no one loses something they paid for.
To take a course offline for everyone, including the members who have it, unpublish it instead. See Publish or unpublish a course. Podcast and community products don't have a Settings tab, so they can't be archived or deleted in the app yet; unpublish them instead.
To delete a single module, submodule or lesson, use the trash icon in the course builder's Outline tab.
What happens next
- A new product is a draft: only your team can see it. Add its content, then publish it.
- To sell it, create an offer that includes it. People who get access appear on the product's Customers tab.
- There's no delete button for products in the app. Leave a product you don't need as a draft; it still counts toward your plan's product limit.
Common errors
- "You've reached your … plan's limit of … products. Upgrade in Settings → Billing to add more.": you're at your plan's product limit. Upgrade in Settings → Billing, or reuse an existing draft.
- "Please fix the highlighted fields.": the title is empty or longer than 200 characters.
- "Could not create the product. Please try again.": a temporary problem. Try again.
- "You don’t have permission for this.": you're signed in as a viewer.
- "Your free trial has ended, so your workspace is read-only. …": subscribe in Settings → Billing to make changes again. Nothing has been deleted.
- "Use a JPG, PNG, WebP, or GIF image." or "Image must be 10 MB or smaller.": pick a different image file.
- "Course not found.", "Could not save the details." or "Could not update the thumbnail.": reload the page and try again.