Forms turn visitors into contacts. A form collects an email (and anything else you ask for), creates or updates the contact, and can tag them, subscribe them to your marketing email, notify your team and start automations. You build a form once in Marketing → Forms, then place it on any page with the Form block, embed it on another website, or use it in a funnel.
Who can do this
- Owners, admins and staff can create and edit forms. No plan is needed.
- Only owners and admins can delete a form or change Global form settings.
- Viewers can open forms and their submissions. Save form shows "You don’t have permission for this."
Create a form
- Go to Marketing → Forms (
/marketing/forms) and click New form. The page is titled Create a form. - Type a Form name. Only your team sees it.
- Under Fields, Use the global default fields is ticked, so the form shows your default fields and follows any change to them. Untick it to give this form its own fields: each row has a label, a type (Text, Email, Phone, Message (several lines) or Dropdown), Required, arrows to move it and a remove button. A Dropdown shows a Choices, one per line box: type each option on its own line (up to 30). Visitors pick one, and a submission with any other answer is refused. Message (several lines) is a box for a longer answer, up to 5,000 characters, such as "Tell us about your project". Add field adds a row, up to 20. A form needs an email field.
- Under Opt-in settings, choose Single opt-in or Double opt-in (next section).
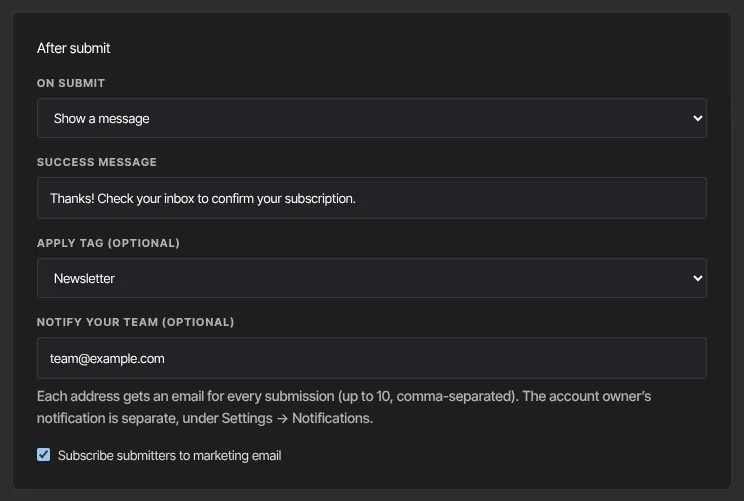
- Under After submit, set On submit: Show a message with a Success message, or Redirect to a URL with a Redirect URL on your own site: a full address starting with https://, or a page on your site starting with
/, such as/thank-you. - Optional: Apply tag (optional), Notify your team (optional) (up to 10 addresses, separated by commas; each gets an email for every submission), and Subscribe submitters to marketing email, which is ticked by default.
- Click Save form. You're taken to the form's page.
The standard default fields (name, phone, address, city, state, country, zip code and business number) also fill in those details on the contact.
Single or double opt-in
- Single opt-in (the default): contacts are subscribed as soon as they submit. The tag and the form's automations happen straight away.
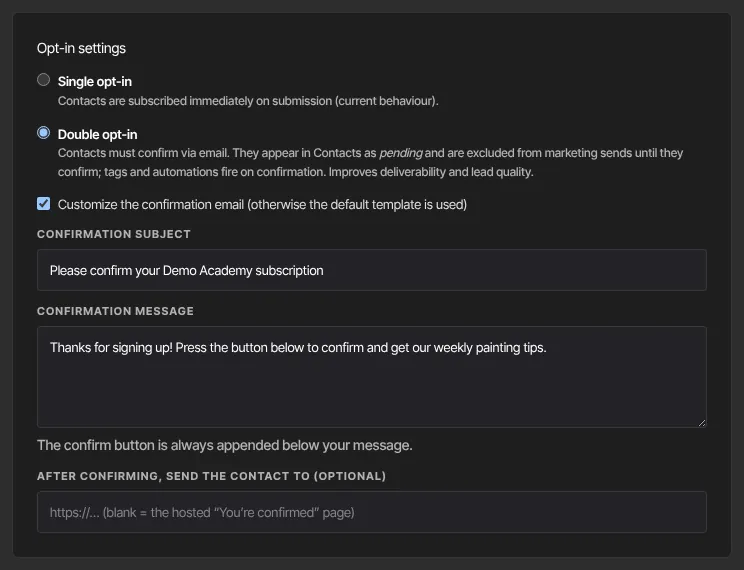
- Double opt-in: contacts get a confirmation email first. They appear in Contacts as pending and get no marketing email until they confirm. The tag and the automations happen only when they confirm.
To set up double opt-in:
- Choose Double opt-in.
- Optional: tick Customize the confirmation email and fill in Confirmation subject and Confirmation message. The Confirm my subscription button is always added below your message. Otherwise the subject reads "Please confirm your subscription to" followed by your business name.
- Optional: fill in After confirming, send the contact to (optional) with a page on your site. Leave it blank to show the hosted You’re confirmed! page.
Double opt-in needs Subscribe submitters to marketing email ticked. Without it the form behaves as single opt-in and sends no confirmation.
Put the form on a page
- Open a page in the website builder and add a Form block.
- Under Form, pick your form. Set the Heading and the Button label (the default is Sign up), and any layout options.
- Publish the page. See Edit pages with the builder.
Every form also has its own page on your site, and you can embed it elsewhere: see Form defaults, bot protection and embedding a form.
Review submissions and automations
- The Submissions tab lists the latest 50 submissions with When, Contact and the values they entered.
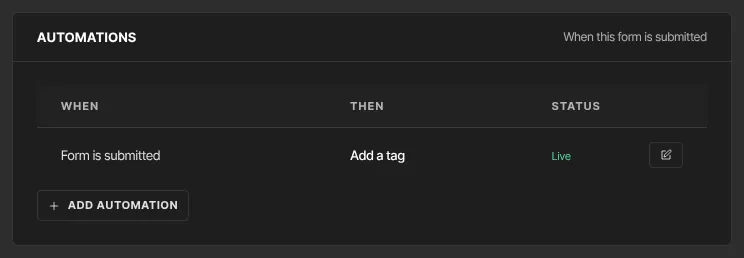
- At the bottom of Form details, the Automations panel ("When this form is submitted") lists the automations that start from this form, with their status and an edit button. Add Automation starts a new one.
Delete a form (owners and admins)
- In the Forms list, click Delete on the form's row, then Confirm delete.
- Automations that start from the form stay Live in your list but can never run again. Unpublish or change them.

Zinstruct's own newsletter
The newsletter box in the footer of zinstruct.com is The Creator Brief, Zinstruct's own newsletter. It isn't one of your forms and doesn't add anyone to your contacts. To join or leave it, see The Creator Brief.
What happens next
- Single opt-in: a new contact is created (source "form"), or the existing contact with that email is updated with any details they filled in. With Subscribe submitters to marketing email ticked they're subscribed, which also re-subscribes someone who had unsubscribed. The tag is applied, automations run, your team is emailed, and the visitor sees your message or your redirect page.
- Double opt-in: the confirmation link works once, for 7 days. When they press Confirm my subscription, they're subscribed, tagged and the automations run. Someone who unsubscribes before confirming stays unsubscribed. There's no button to resend the email; they can submit the form again for a new one.
- You also get a New form submission email when that notification is switched on. See Choose which notification emails you get.
- A Redirect URL that isn't on your site is ignored, and the visitor sees your success message instead.
Common errors
- "A form needs an email field." or "Add at least one field.": add an Email field.
- "Label is required.": a field row has no label.
- "Use a full https:// address, or a page on your site starting with /.": fix the Redirect URL. Addresses starting with
//, containing spaces or backslashes, or using anything other than http(s) aren't accepted. - "Please check “Confirm redirect url”.": the after-confirming address must be a full address that starts with https://.
- "Please check “Notify emails”.": one of the team addresses isn't valid.
- "You don’t have permission for this.": you're a viewer, or your workspace is read-only.
- "You don’t have permission to do that.": staff and viewers can't delete forms.
- "Could not save the form.": try again in a moment.