Every website page and landing page is edited in the same builder. A page is a stack of sections, and each section holds blocks: headings, text, images, buttons, forms, offers and more. This article covers the toolbar, adding and arranging content, a page's own design, reusable sections, saving and previewing.
Who can do this
- Staff, admins and owners can edit pages and click Save draft.
- Publishing needs an owner or admin. See Publish, unpublish or delete a page.
- Viewers can open the builder and look around, but Save draft shows "You don’t have permission for this."
Open a page
- Go to Website and click Edit on a page (or its title). For a landing page, start from Website → Landing Pages.
- The builder opens at
/website/pages/…(or/website/landing-pages/…).
Along the top is the toolbar: a back link, the page title box, the URL box (Home has none), the status (Draft, Live or Live · unpublished changes), the Members only box, then View for a live page, AI when it's available for your account, Templates, Design, Preview, Unpublish, Save draft and Publish.

The URL follows the title until the page is first published or you edit the URL yourself. Use lowercase letters, numbers and hyphens.
Add and arrange content
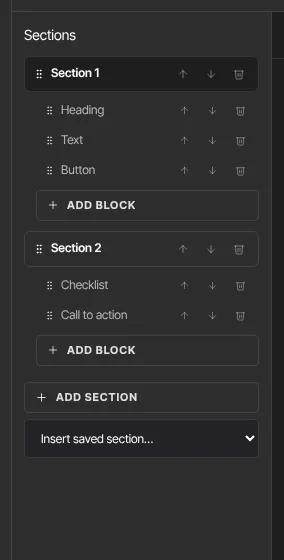
- The Sections outline on the left lists Section 1, Section 2 and so on, with each section's blocks under it.
- Click Add section at the bottom of the outline to add an empty section. Click Add block under a section, search with Search blocks…, and pick a block. See the Block catalog.
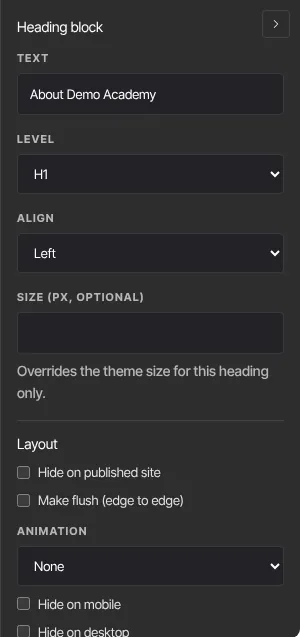
- Click a block, in the outline or on the page preview, to select it. Its settings open in the panel on the right. You can also type straight into a selected heading or text on the page.
- Drag rows in the outline to reorder them, or use the up and down arrows (Move up, Move down). The bin icon removes a section or block.
- Select a section to set its Section type (Normal band, Two-step opt-in or Exit popup), Background, padding and Section alignment. Background offers None, Surface, Primary, Dark, Accent and Custom colour. Dark and Accent use the band colours from your Style Guide, and the text on them switches to the matching band text colour. Cards in a coloured band, such as pricing cards and testimonials, keep their light background and your normal text colours, so they stay readable. The on required form fields switches to the band's text colour too. Full bleed (edge to edge) spans the full width with no side or top padding, and a hero or banner in it gets square corners so it meets the edge of the screen. Turning off Contain width and setting Side padding to None squares them too. Content width: Article (720px) keeps long text at a comfortable reading width, as in a blog post. Content width: Narrow (520px) keeps the section's content in a phone-shaped column while its background still spans the page, as on a link-in-bio page. Height: Full screen* makes the section at least as tall as the screen, with its content centred top to bottom, so a one-section page has no empty strip below it.
- A selected block also has Layout options: Hide on published site, Make flush (edge to edge), Animation, Hide on mobile and Hide on desktop.
Above the page preview are undo and redo arrows, desktop, tablet and mobile width buttons, and Focus, which hides everything but the page (press Esc to leave).
Change this page's look
- Click Design. The Page design panel opens.
- For Background, Text colour, Heading colour, Button colour and Button text colour, click Customize to pick a colour, or Reset to go back to your Style Guide.
- Pick a Font, or tick Full-width page to let sections span the whole screen. Clear all overrides undoes them all.
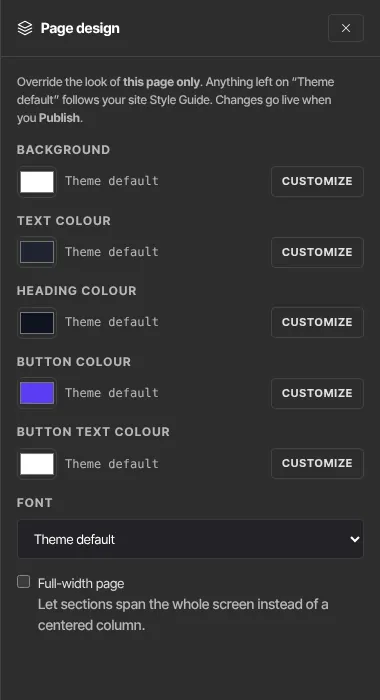
These settings affect this page only. Everything else follows your Style Guide.
Reuse a section on other pages
- Select a section and click Save as reusable section at the bottom of its panel. Name it when asked ("Save this section as…"). The toolbar says "Section saved".
- On any page, choose it from Insert saved section… under Add section. A copy is added at the bottom of the page.
- Click Save draft.
Saved sections can't be renamed or removed, so give them clear names.
Save and preview
- Click Save draft. The toolbar shows "Saved". If you try to leave with unsaved changes, your browser warns you.
- Click Preview. Your draft is saved, and a new tab shows the page in a frame with desktop, tablet and mobile sizes. A Draft preview banner reminds you that visitors still see the published version. Open raw opens the page without the frame.
If your browser closed before you saved, the next time you open the page a bar says "Unsaved work from your last session was recovered." Click Restore to bring it back, or Discard to drop it. There's no button that throws away a saved draft and returns to the live version.
What happens next
- A saved draft stays private. On a live page, though, a new title, URL or Members only setting applies as soon as you save. If you change a live page's URL, its old address stops working.
- Content and design changes go live when an owner or admin publishes.
Common errors
- "Save failed — your changes are NOT saved. Check your connection and try again.": check your connection, then click Save draft again.
- "That URL slug is already taken.": another page uses that URL. Pick a different one.
- "Please fix the page settings.": the title is empty, or the URL has characters other than lowercase letters, numbers and hyphens.
- "Please fix the page design colours.": reset the colour you changed in Design and pick it again.
- "The page content is invalid.": undo your last change and save again.
- "You don’t have permission for this.": you're a viewer, or your free trial has ended and the workspace is read-only.
- The Preview tab opens and closes at once: the save failed. Read the message in the toolbar.
- A page whose URL is `blog` never shows: that address always shows your blog. Pick another URL.