A newsletter product is a series of posts (issues) that your subscribers read in an archive in their member area. You write each post in the Writer, a one-page writing view with AI tools, or switch to Design for the same block editor you use for website pages. Publishing a post adds it to the archive; it does not email anyone. Emailing a post is a separate, one-time step, covered in Email a newsletter post to subscribers.
Who can do this
- Owners, admins and staff can create a newsletter, add posts and save drafts. Each new newsletter counts toward your plan's product limit.
- Only owners and admins can publish, unpublish or delete posts, and publish the newsletter itself. When staff click Publish, their draft is saved but not published, and they see "You don’t have permission for this." Unpublish and the bin icon show staff "You don’t have permission to do that."
- Viewers can read posts but not change them. New post shows "You don’t have permission to do that." and Save draft shows "You don’t have permission for this." The AI tools show them "You don’t have permission to use AI writing."
Create the newsletter
- In the sidebar, open Catalog → Newsletters and click New newsletter. Or go to Catalog, click New product, pick Newsletter and click Get started.
- On Newsletter details, fill in Title and Brief description, and optionally add a Thumbnail image (optional). This is the only place to set a newsletter's thumbnail.
- Click Create newsletter. It opens on its Posts tab, as a draft.
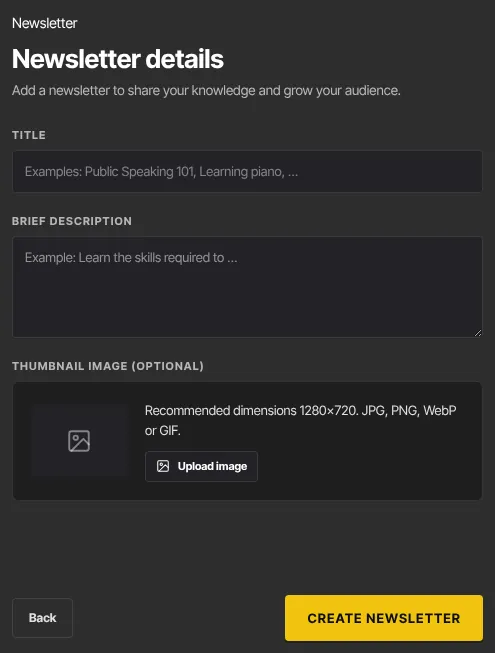
You can change the title and description later on the newsletter's Settings tab.
The type picker lists features such as scheduling, segments, free and paid tiers, open and click analytics and a public archive. Newsletter posts can't be scheduled, sent to a segment, split into free and paid parts or tracked for opens and clicks, and the archive is for subscribers only.
Write a post
- On the Posts tab, click New post. A post named "Untitled post" opens in the Writer.
- In the toolbar, type the post's Title and, optionally, a Short excerpt (optional), which shows under the title in the archive.
- In the Email row under the toolbar, you can set an Email subject (left blank, the email uses the post's title) and Preview text, the line inboxes show after the subject. ✨ Suggest proposes both from what you've written.
- Write the post. In the Writer, type as in a document: its toolbar has formatting, headings, lists, links, images, buttons and dividers, Personalize… for merge tags such as first name, and the AI tools (Topic ideas, Format text, Draft with AI, ✨ AI rewrite… and Check writing). See Write newsletters and emails with AI. Template… starts the post from a newsletter template, and Save as template saves this post's layout as one.
- To lay out sections and blocks instead, click Design in the Writer | Design switch. Both views edit the same post. In Design, build the post with blocks, as you would a website page. If you add blocks that can't appear in email, such as a video, a yellow note in the toolbar names them: readers of the emailed version get a link to the post instead. To write, add a Text block (it's formatted as you type), click it on the page and type where you clicked. An older plain text block becomes one the first time you click it, keeping its bold, italic, links and line breaks. A toolbar above the block has bold, italic, underline, H2 and H3 headings, bulleted and numbered lists, a quote, a link (also Ctrl+K, or ⌘K on a Mac) and { } to add a merge tag such as first name. The panel on the right keeps only the block's settings, such as Text align: click > at its top to slide it out of the way while you write, and < to bring it back. Press Esc or click outside the block when you're done. The editor shows the post the way subscribers get it by email, on a white page at inbox width; in the archive it takes your site's fonts and colours. A template's prompts, such as "[Step one]", are highlighted: click one to select it and type over it, and press Tab to jump to the next (Shift+Tab goes back). If any are left when you click Publish or Send, you're asked first. Pasting keeps bold, italic, underline, links, lists, quotes and headings and drops other fonts and colours; text copied from ChatGPT or Claude keeps its formatting (press Ctrl+Z once to get the raw text back), and Ctrl+Shift+V (⌘⇧V on a Mac) pastes plain text. Typing or pasting
{{ first_name }}makes a merge tag; a tag we don't fill in gets a wavy underline. Type{{to pick a merge tag, or/on an empty line to turn it into a heading or list, or to add an image, button or divider below it. - A draft saves itself a moment after you stop typing: the status next to the excerpt reads Draft · Saved. You can also click Save draft (you'll see Saved). Once a post is published, changes wait for Save draft, and Unsaved changes reminds you.
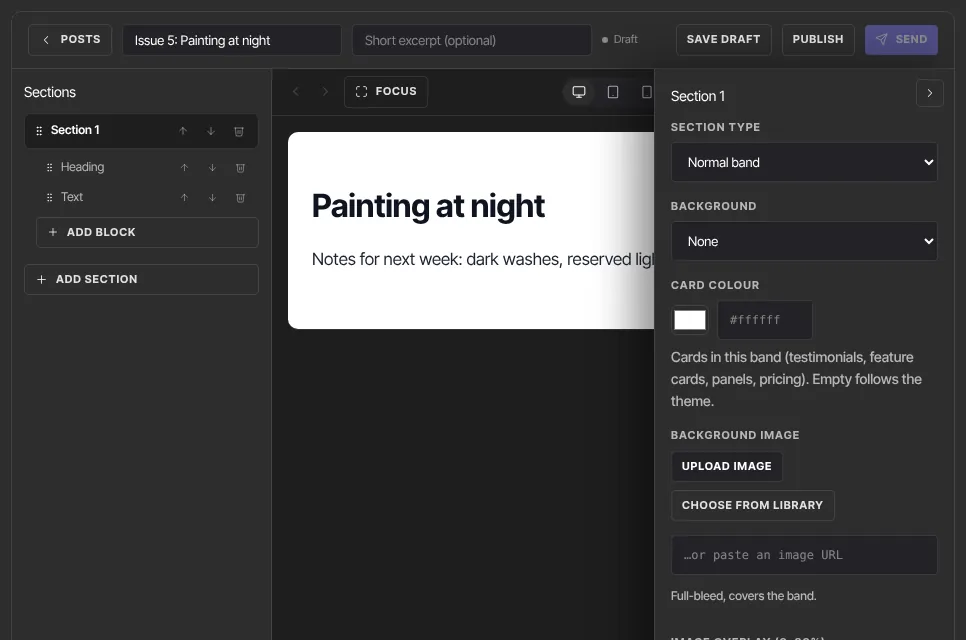
Click Posts in the toolbar to go back to the list. Edit on a row opens a post again.
Publish a post
- In the post editor, click Publish. The post is saved and published, and the toolbar shows Published and a green Live dot.
- If the newsletter itself is still a draft, click Publish newsletter on the Posts tab. Subscribers can open the archive only while the newsletter is published.
Publishing doesn't email anyone, even though the empty Posts tab says posts email subscribers. To email a post, use Send; see Email a newsletter post to subscribers.
You can keep editing a published post. Subscribers see your changes only after you click Publish again.
Unpublish or delete a post
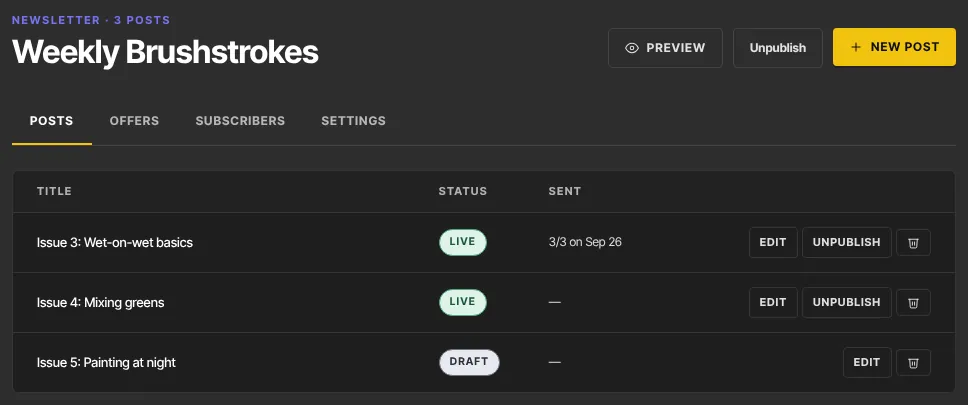
On the Posts tab, each row shows the Title, the Status (Live or Draft) and, once emailed, how many emails went out and when (for example "3/3 on Oct 1").
- Click Unpublish to take a live post out of the archive. It goes back to draft. A post that was already emailed stays marked as sent.
- Click the bin icon to delete a post. It's deleted straight away, with no confirmation and no undo, even if it was already emailed; links to it in emails you sent stop working.
What happens next
- Subscribers with access open the newsletter from their library (Read issues). They see every published post, newest first, including posts published before they joined.
- People get access through an offer (the newsletter's Offers tab) or access you grant by hand. The Subscribers tab lists them. See Offers overview.
- Unpublishing the newsletter itself takes the whole archive offline; subscribers see "This newsletter isn’t available right now".
Common errors
- "You've reached your … plan's limit of … products. Upgrade in Settings → Billing to add more.": you're at your plan's product limit.
- "Please add a title.": type a title in the toolbar, then save or publish again.
- "Could not save the post." or "Could not publish the post.": try again in a moment.
- "You don’t have permission for this.": staff can't publish and viewers can't save. If you're the owner, check whether your free trial has ended.
- "You don’t have permission to do that.": only owners and admins can unpublish or delete posts, and viewers can't create them.
Related articles
- Email a newsletter post to subscribers
- Write newsletters and emails with AI
- Edit pages with the builder
- Offers overview
- Read newsletters and download files (what subscribers see)